


I have been exploring NestJS and in order to understand the concepts a little better and get hands-on practice I decided to create a basic API consisting of all the CRUD operations , however it isn't connected to a database , the data is stored , fetched and manipulated locally.
CRUD basically stands for Create , Read , Update , Delete. The corresponding HTTP verbs are:
Create -POST
Read -GET
Update- Patch
Delete-Delete
Installing NestJS
So for starters we first we create a new project using the nestjs CLI. Running the following command will create a project structure , populated with all the necessary files that can be changed later , as and when required.
npm i -g @nestjs/cli
nest new project-name
The above commands will create a project with the controller and services files that can be further changed according to the requirements.
Defining the module
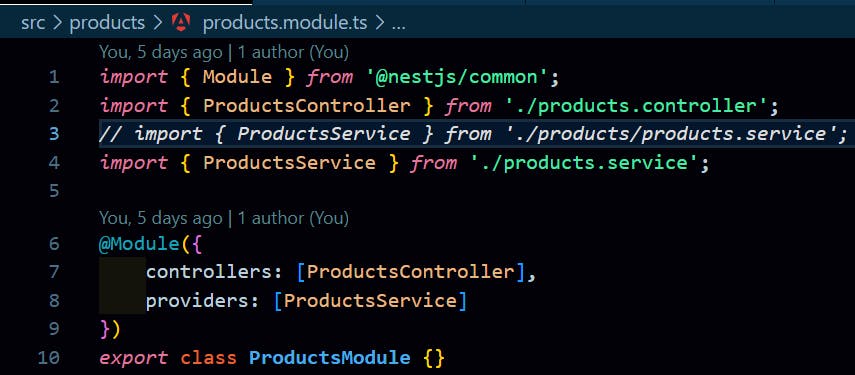
So a NestJS web application typically consists of a module inside which we have controllers (for routing) and providers/services (for handling controllers). So first we create a module named 'products' that will handle things like import from other modules and etc. Modules can be created using the CLI , to create a module using CLI we use the following command:
nest g module products
The above file creates a products.module.ts file that has all the defsult imports and it also specifies the controllers and providers for that particular module , as shown below:
Defining Controller
So now that we have a module we define the controller. We can define the controller using the following CLI command:
nest g controller products
The above command creates a controller named 'products'. Here we are defining the http verbs and what it will return as the response back to the end user.
import { Controller, Post, Body, HttpException, HttpStatus , Get , Param, Patch , Delete} from '@nestjs/common';
import { ProductsService } from './products.service';

@Controller('products')
export class ProductsController {
  constructor(private readonly productService: ProductsService) {}

  @Post()
  async addProduct(
    @Body('name') prodName: string,
    @Body('desc') prodDesc: string,
    @Body('price') prodPrice: number,
  ): Promise<{ id: string }> { // Explicit object type for clarity
    try {
      const newProductId = await this.productService.insertProduct(prodName, prodDesc, prodPrice);
      return { id: newProductId }; // Return the ID in a clear object structure
    } catch (error) {
      throw new HttpException('Failed to create product', HttpStatus.BAD_REQUEST);
    }
  }
  @Get()
  fetchAllProducts(){
    return this.productService.getAllProducts();
  }
  @Get(':id')
  getSingleProduct(@Param('id') prodId:string){
    return this.productService.fetchSingleProduct(prodId);
  }
  @Patch(':id')
  updateProduct(
    @Param('id') prodId:string,
    @Body('name') prodName,
    @Body('desc') prodDesc,
    @Body('price') prodPrice
  ){
    this.productService.updateProduct(prodId,prodName,prodDesc,prodPrice);
    return null;
  }
  @Delete(':id')
removeProduct(@Param('id') prodId:string){
  this.productService.deleteProduct(prodId);
  return null;
}
}
In the import we first are importing all the HTTP verbs that we want to use in this controller and the Body that basically defines that we are sing the incoming request body in the route. Then we have the HTTP verbs and the associated methods that are defined in the services for handling those requests.
The first Post method basically creates data by accepting the incoming body parameters in the request body. insertProduct() is a method defined in products.Service( this is a type defined from the products.services.ts) that basically helps in creating a request to store some data.
The second Get request basically returns all of the data that has been stored in the memory till now , the get method does not accept any request body. It makes use of the getAllProducts() method defined in the products.service.
The third Get request returns the data for a specific 'id' (in this case , the ID of the product) that is passed in the URL and to fetch it we use the @Param decorator in NestJS. The user sends the ID of the product and the method returns the details of that product.
Next we use the Patch method to update the details for a given product by passing the 'id' in the URL and the name , price and description in the body. It uses updateProduct() method defined in the products.service.
Lastly we use the Delete decorator in order to accept the 'delete' requests from the frontend , it uses the removeProduct() method defined in the product.service.
constructor(private readonly productService: ProductsService) {}
The above line of code basically injects the service in the controller that helps us in using the methods defined in the service , in our case product.service.
Defining Services
In the services we write the code that helps in handling the incoming requests , for example in this we write code to handle the insertion ,
updation , deletion and fetching the data.
import { Injectable , NotFoundException} from '@nestjs/common';
import { Product } from './product.model'; // Assuming your product model
@Injectable()
export class ProductsService {
  private id: string;
  private products: Product[] = [];
  async generateProductId(): Promise<string> {
    return `P${await Math.floor(Math.random()*9000)}`;
  }

  async insertProduct(name: string, desc: string, price: number): Promise<string> {
    const newProductId = await this.generateProductId();
    const newProduct = new Product(newProductId, name, desc, price);
    this.products.push(newProduct);
    return newProductId; // Return the generated ID here
  }

  getAllProducts(){
    return [...this.products];
  }
  fetchSingleProduct(prodId:string){
    const product= this.findProduct(prodId)[0];
    return {...product};
  }
  updateProduct(productId: string, title: string, desc: string, price: number) {
    const [product, index] = this.findProduct(productId);
    const updatedProduct = { ...product };
    if (title) {
      updatedProduct.name = title;
    }
    if (desc) {
      updatedProduct.desc= desc;
    }
    if (price) {
      updatedProduct.price = price;
    }
    this.products[index] = updatedProduct;
  }
  deleteProduct(prodId:string):{success: boolean, message?: string}{
    // const index=this.findProduct(prodId)[1];
    // this.products.splice(index, 1);
    const deletedProduct=this.products.splice(this.findProduct(prodId)[1],1);
    if (deletedProduct) {
      return { success: true, message: 'Product deleted successfully.' };
    } else {
      return { success: false, message: 'Product not found or deletion failed.' };
    }
  }
  private findProduct(id: string): [Product, number] {
    const productIndex = this.products.findIndex(prod => prod.id === id);
    const product = this.products[productIndex];
    if (!product) {
      throw new NotFoundException('Could not find product.');
    }
    return [product, productIndex];
  }

}
At the very start we import Injectable that is basically denoting that the service can be injected in other components.
Next we import the product.model as Product that basically defines a structure of how the data is to be passed , discussed in next section.
We have defined a products variable that is basically an array and is of the type Product
Next up , there is a method defined that generates random numbers to be used as product IDs
In each defined method , we first specify what are the arguments it accepts and then what that method will return back.
Inside the methods i have used the various concepts of TypeScript like the use of spread operator to achieve the required functionality.
Defining a data model
Here , we also define a model data structure of how the data is passed and what fields are required. It is a simple class that is exported and then imported in the products.service where we create an array products of the type Product.
export class Product{
    constructor(
        public id: string,
        public name : string,
        public desc:string,
        public price:number,
    ){}
}
Starting the Dev Server
Depending on the package manager that you are using, you can use either of the below CLI commands in order to get the decelopment server up and running:
If using yarn
yarn run start --watchNote: In order to avoid restarting the server ,every time after changing the code , you can use --watch flag , it basically keeps tracking the changes and automatically shows the changes in application.
if using npm
npm run start